Section 01
What is hauling?
Star Citizen is a living universe, and that universe runs on trade. Every city, every station, every outpost needs goods — food, fuel, medical supplies, industrial materials — and someone has to move them. That someone is you. As a hauler you're the backbone of the economy, loading up your ship at one terminal and selling the cargo at another for profit.
There are two ways to haul. The first is commodity trading — you buy goods with your own aUEC and sell them where demand is higher. You own the cargo and pocket the difference. The second is contract hauling — an NPC company like Covalex or Red Wind Linehaul hires you to pick up and deliver their cargo for a fixed fee. Lower risk, lower reward, great for learning the ropes.
New pilot tip
Start with contract hauling missions from the MobiGlas Contract Manager. They're low stakes — you're not gambling your own credits — and they teach you every part of the loading, flying, and delivery loop before you put your own money on the line.
Commodity Trading
Buy low, sell high
You buy the cargo yourself and sell it at a profit. Higher upside, but your aUEC is at risk if you get blown up or prices shift. Schaulers shows you exactly where to buy cheap and where prices are highest — in real time.
Contract Hauling
Fixed fee delivery
Pick up NPC cargo and deliver it for a set payout. Safe, predictable, and a great way to learn the game without financial risk.
Player Contracts
Work for other players
More advanced — other players hire you to move their goods. Higher trust required, but often the best pay in the verse.
Section 02
Understanding SCU
Before you can pick a ship or plan a route, you need to understand SCU — Standard Cargo Units. Think of it as the universal box size that everything in the verse is measured in. One SCU is roughly one cubic metre. Your ship's cargo hold is rated in SCU, the contracts you take specify SCU, and the crates you physically load into your ship are sized in SCU.
Crates come in standard sizes: 1 SCU, 2 SCU, 4 SCU, 8 SCU, 16 SCU, and 32 SCU. The size of crate your ship uses depends on its cargo grid layout — your job is to fill that grid efficiently. All crates need to be placed inside the cargo grid to lock in and persist through quantum travel.
The cargo grid matters
Cargo
must be placed inside the cargo grid — the marked area on your ship's floor — or it won't persist through quantum travel. A crate rattling loose in your hold might vanish on the next jump. Always lock it in.
Small Crates
1–4 SCU
Common in contract missions and starter ships. Easy to move and position — good for getting comfortable with tractor beam handling.
Medium Crates
8–16 SCU
The bread and butter of mid-tier hauling. Both the TruHold and MaxLift can handle these — start with the TruHold and upgrade to the MaxLift as your runs get heavier.
Large Crates
32 SCU
Used by the Hull series and larger ships like the Caterpillar. These are heavy-duty containers that benefit from organised crew work and ground vehicles like the ATLS to move efficiently.
Section 03
Picking your ship
Your ship is everything. It determines what contracts you can take, how much cargo you can move per run, and how quickly you can scale up your earnings. The good news — you don't need the biggest ship to make good money. You need the right ship for where you are in the game.
Ships are roughly split into four tiers. Start where you are, not where you want to be. A pilot who knows their Cutlass Black will out-earn a pilot fumbling around in a ship they can barely navigate.
The ships most new pilots already own. The MISC Hull A deserves a special mention for beginners — its cargo sits on an external spindle that extends on the ground, making it one of the easiest ships to load and unload in the game. The Avenger Titan has a modest 8 SCU hold — not a hauler by trade, but enough to run small delivery contracts and learn the loop. The Drake Cutlass Black is a popular choice among haulers: 46 SCU, solid shields, and fast enough to run when things get scary. The MISC Freelancer sits at 66 SCU and is the most dedicated hauler of the three. Start here, learn the game, stack credits.
This is where hauling starts to feel serious. The Freelancer MAX at 120 SCU is a workhorse — easy to fly, good range, and handles the most profitable mid-tier routes comfortably. The Constellation Taurus edges it out at 174 SCU with stronger defences. The C1 Spirit is newer, sleeker, and surprisingly capable. At the top of this tier sits the MISC Hull B — 512 SCU across 16 x 32-SCU containers. It can be flown solo and even lands planetside fully loaded, which sets it apart from the larger Hull series. At this tier, a single good run can net you serious aUEC.
Now we're talking serious freight. The Crusader C2 Hercules Starlifter is the most popular large hauler — 696 SCU, military-grade armour, and it can carry vehicles too. The Drake Caterpillar is modular and tough, a favourite for players who like flexibility. At this tier you'll want to know your routes cold before undocking.
The MISC Hull C is the endgame hauler — 4,608 SCU carried in 32-SCU containers along an exposed cargo spine. It's a different class of operation entirely. The Hull C is designed for auto-loading at space stations — you don't hand-load this ship, the station does it for you. That also means you're tied to stations that support auto-loading, and the exposed spine makes you a highly visible target. This is a long-term goal, not a casual upgrade. When you're flying a Hull C, you're running a logistics operation.
Schaulers Tip
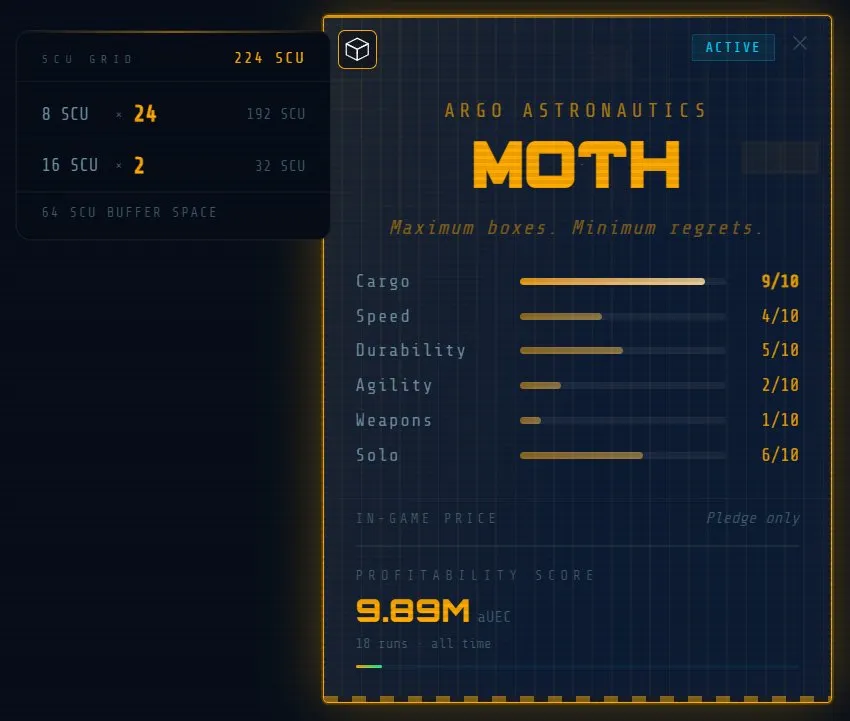
Use Schaulers to filter routes by your exact ship and cargo size. It knows the SCU capacity for 70+ ships and only shows you runs you can actually complete. No guesswork, no wasted trips.
Schaulers — ship selector showing live routes filtered to your cargo capacity
Section 05
Your first run
Theory is great, but at some point you have to undock. Here's the loop for your very first haul — step by step, nothing assumed.
01
Open your MobiGlas
Hit F1 to pull up your MobiGlas. Head to the Contract Manager and look under the Hauling tab for anything labelled Freight Hauling or Cargo Transport. Before you accept, check the SCU requirement against your ship's capacity — taking a job your hold can't fit is a rookie mistake you only make once.
02
Get to the pickup location
Your HUD will mark the pickup point. Quantum jump over, call in your landing request, and touch down on your assigned pad. Before you do anything else, find the freight elevator terminal — it's your gateway to the cargo and it's usually tucked inside the hangar or near the cargo deck.
03
Call up your cargo
Walk up to the freight elevator console and press F. Find your mission order in the list, confirm it, and the elevator will bring your crates up to the loading platform. First time doing this, the crates will look bigger than you expected. That's normal. Take a breath.
04
Load the cargo
Equip your tractor beam and start moving crates into your ship's cargo grid one at a time. They'll snap into place — but make sure each one is fully seated before moving to the next. Smaller crates are forgiving. Larger ones take patience. Don't rush and don't leave crates hanging half-out of the grid.
05
Fly to the delivery point
Ramp up, request launch clearance, and get moving. Quantum jump to the destination, request landing, and set down at the dropoff. Then reverse the process — find the freight elevator, interact with it, and move your cargo off the ship and into the delivery zone.
06
Submit and get paid
Once the cargo is confirmed delivered, open your MobiGlas and submit the contract. The aUEC hits your account. That's it — your first run is done. Log it in Schaulers and the climb begins.
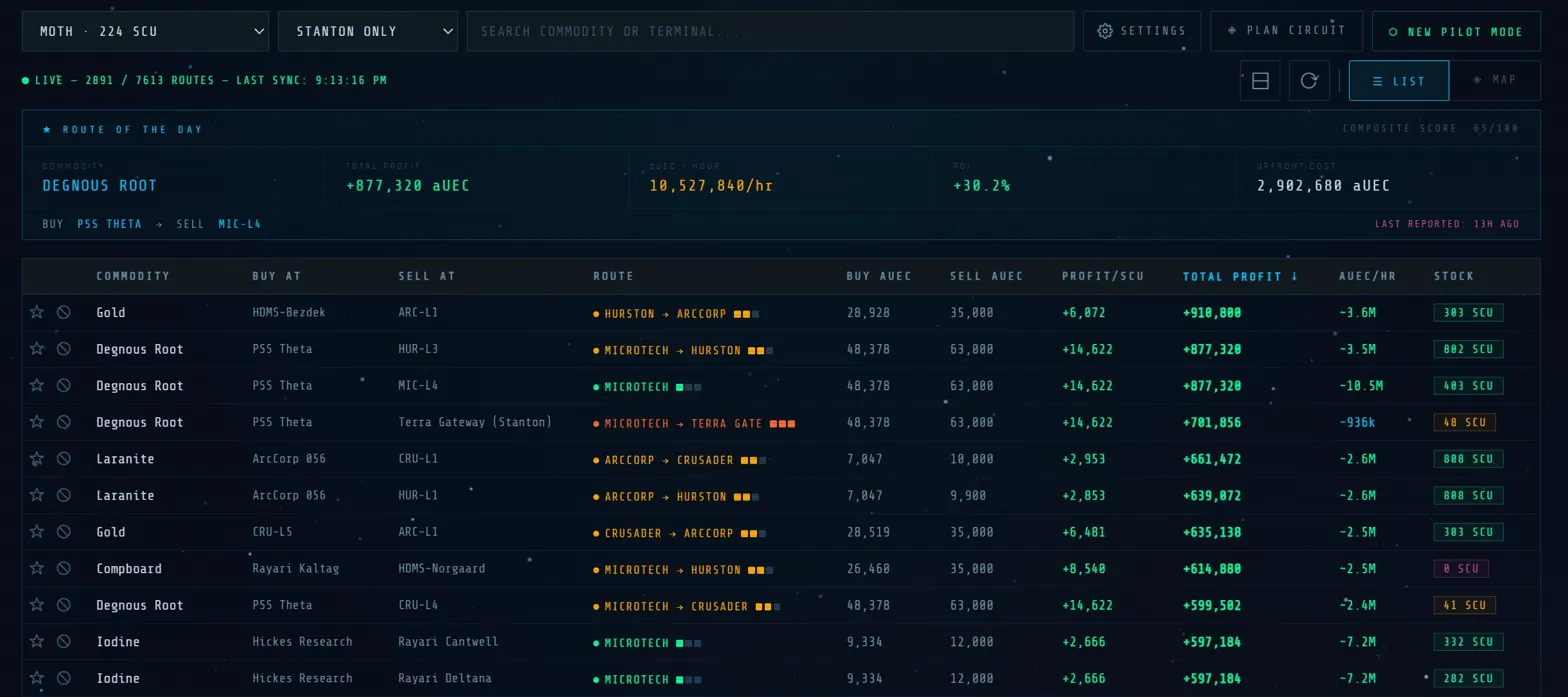
Schaulers — live route table sorted by total profit. Your next run is already up there.
Section 06
What to haul
Unlike personal gear or ship components, commodities exist purely to be moved and sold. Prices shift constantly as players buy and sell across the verse — a terminal that's paying well today might be flooded by tomorrow. That volatility is the game, and reading it is what separates good haulers from great ones.
The main place to trade is the Trade & Development Division (TDD) — you'll find these in every major city. Space stations have their own trade terminals too, usually in the admin area, and surface outposts often have smaller kiosks if they deal in raw materials. To buy, walk up to a kiosk, press F, set your ship as the destination, hit the Buy tab, pick your commodity, use the slider to set the quantity, and confirm. That's the loop.
Vice Commodities
Some goods — often called "vice commodities" — are illegal or regulated depending on jurisdiction. Things like SLAM can be profitable but come with serious risk: confiscation, fines, ship impoundment, or imprisonment if you're caught. The 'verse has eyes. Weigh the profit against what you stand to lose.
Once you're ready to trade on your own account, the question becomes: what's actually worth hauling? Not all commodities are equal. Some are safe, predictable, and widely available. Others are high-value and high-risk. Here's a rough breakdown.
| Commodity |
Risk Level |
Why Haul It |
Notes |
| Agricultural Supplies |
SAFE |
Steady, low-competition routes between farms and cities |
Great beginner commodity — pirates target ship size, not cargo type |
| Medical Supplies |
SAFE |
Consistent demand, good availability at major stations |
Reliable but not exciting margins |
| Titanium / Tungsten |
SAFE |
Industrial mid-tier — strong volume and steady stock |
The workhorse commodity for mid-ship haulers |
| Beryl / Aluminum |
SAFE |
Buy near mining outposts, sell at city trade terminals |
Good margins without attracting attention |
| Diamonds |
MODERATE |
High value per SCU, widely traded |
Worth it in a faster ship with good shields |
| Laranite |
MODERATE |
One of the best profit-per-SCU commodities in Stanton |
Found at remote outposts — pirate risk during collection |
| Agricium / Gold |
MODERATE |
Premium tier, excellent margins when stock is available |
Stock limited — move fast or miss the window |
| Neon / Widow (Pyro) |
HIGH |
Some of the best profit margins available — runs here can be extremely lucrative |
Auto-loads at Pyro stations. Know your jump routes and check the Intel Feed first. |
The golden rule
Buy close to production, sell into demand. Mining outposts sell raw materials cheap. High-population stations and city TDDs buy them dear. That gap is your profit. And don't put all your credits into a single commodity — diversify your trades to spread risk across varying market conditions.
This table is a starting point
Commodity prices shift constantly. The table above gives you the lay of the land — but Schaulers shows you the
live version. Every price in the route table is pulled directly from UEX Corp data, so what you see is what the market is actually doing right now, not what it was doing last week.
Section 07
Planning routes
A good route is the difference between grinding and thriving. The basics: buy at a terminal where prices are low, fly to a terminal where that commodity sells for more, pocket the difference. But the best haulers think one step further — they plan the return leg too. Dead-running (flying empty) is aUEC left on the table.
Stanton has four major systems — Hurston, ArcCorp, Crusader, and microTech — each with a planet-side trade terminal and an orbital station hub. The stable logic is to buy from outposts and farms, sell at city TDDs and orbital stations. That's the direction prices flow.
New Pilot Mode
Your first real route
Schaulers has a New Pilot Mode built for players who are still finding their feet. It filters out complex multi-hop runs and high-risk routes, showing only straightforward point-to-point hauls within a safe distance. Select your ship, set your SCU, and it finds you the best run available right now — no spreadsheet required.
Verified Prices · 48H Toggle
Only trust what's confirmed
In Settings, turn on the Verified 48H toggle. This filters the route table to only show prices confirmed by the community within the last 48 hours — so you're never flying a route based on stale data. Stanton only, tight window, maximum confidence. The safest way to trade.
Route Planner · Stanton
Never fly empty again
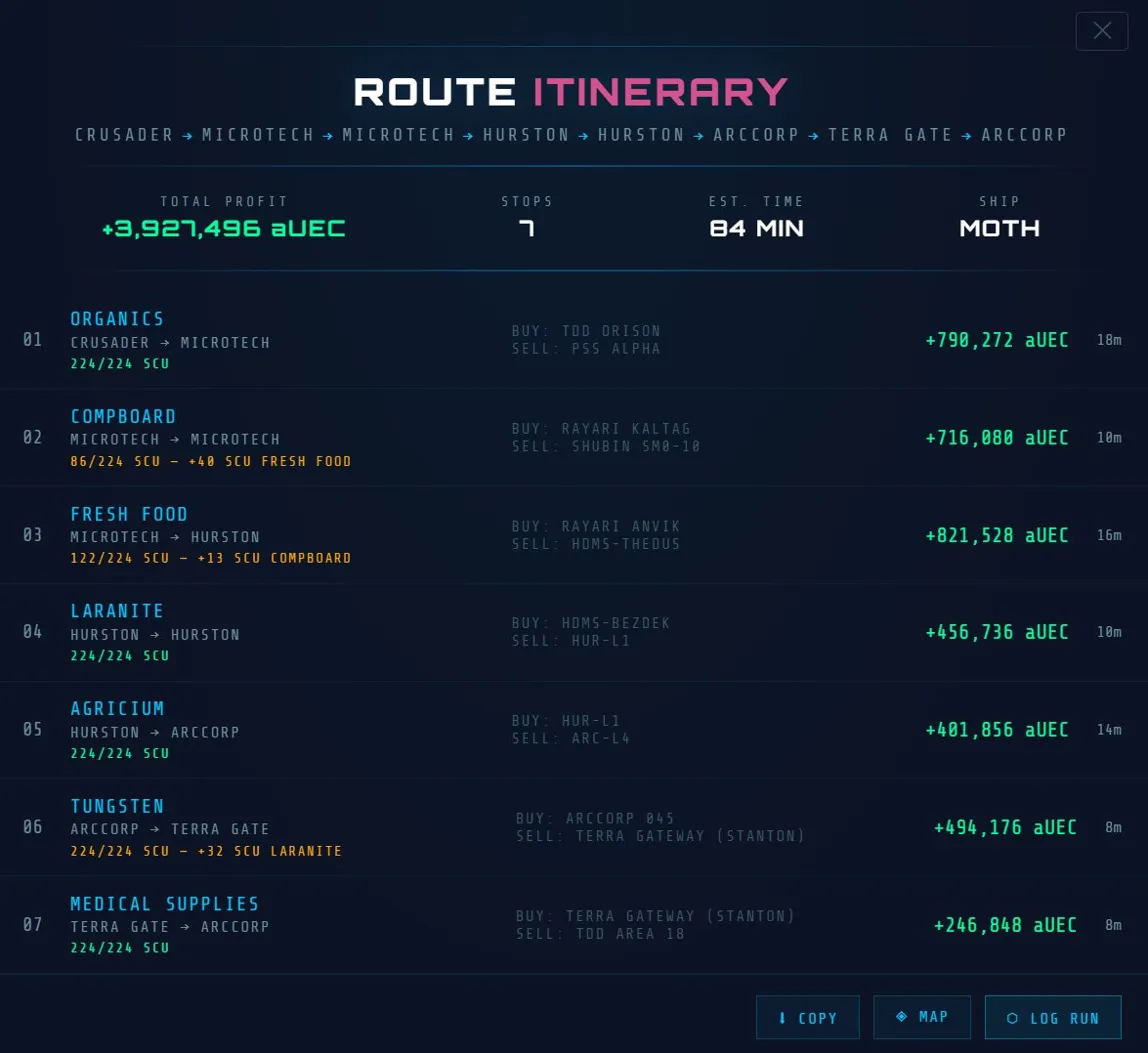
The Route Planner chains runs together so you're always carrying cargo both ways. Pick a starting point in Stanton, set how much time you have available, and it maps a multi-stop loop — as many connected routes as you want. Maximise profit per hour by eliminating dead legs. This is where hauling stops feeling like work and starts feeling like a system.
Pyro Routes
High Risk, High Reward
Pyro has some of the best margins in the verse. Schaulers covers Pyro terminals too — filter by system, check the Intel Feed for recent pirate activity before you jump, and let the route table show you what's worth the risk. The data's live. The decision is yours.
Interstellar Hauling
As of Alpha 4.4, hauling contracts now span all three systems — Stanton, Pyro, and Nyx. These procedurally generated runs cross system boundaries and come in enough variety to suit different ships, playstyles, and risk tolerances. They can be shared with party members and support partial completion if cargo is lost in transit, so a bad run doesn't have to be a total write-off. Industrial hauling missions expanded further in Alpha 4.6. The verse is getting bigger — and so are the opportunities.
Live data matters
Commodity prices change constantly as players buy and sell. A route that paid 50k aUEC per run yesterday might only pay 20k today if the sell terminal is flooded. Schaulers pulls live UEX Corp data so you always see current prices — not stale numbers from a guide written last month.
Schaulers — Route Planner mapping a multi-stop loop through Stanton. No dead legs.
Section 08
Staying alive
Cargo has value. That means other players will try to take it from you. Pirates are a real part of the game and haulers are their preferred target. Here's how to make yourself a less appealing mark.
Situational Awareness
Know the threat landscape
Before every run, check the Intel Feed in the Schaulers app. It surfaces recent pirate activity reports from the community — updated live so you know which corridors are hot right now. If a route is lighting up with reports, consider an alternate path or wait it out.
Ship Insurance
Always be insured
Never undock without active ship insurance. If you get destroyed, insurance covers the hull. Your cargo is gone, but your ship comes back. The bigger and more expensive your ship, the more catastrophic flying uninsured becomes.
Route Risk
Know your exposure
Pirates generally don't know what you're carrying — they go for bigger ships because bigger ships mean bigger paydays. In Stanton that's the main logic. In Pyro it's different territory — organised pirate groups are more active and more aggressive. Match your ship size and route to the risk you're comfortable with.
Getting Interdicted
If it happens
Pirates can pull you out of quantum mid-route. If it happens, your options are: boost and try to re-engage quantum, fight back if you're armed, or comply. Losing cargo hurts — losing your ship and cargo hurts more. Know what your ship can survive and make the call early.
Community intelligence
The Schaulers Route Flag system lets pilots flag terminals and routes as blocked, camped, or clear — updated in real time by the community. If other haulers are reporting a jump point as dangerous, trust them. The verse talks to itself.
Pirate Deck · Terminal
Report what you've seen
The Pirate Deck lets you report pirate activity across Stanton, Pyro, and Nyx. Log the location, area, threat level and ship type. Reports feed into the live Intel Feed and the ticker on the main page. Access it via Command Deck → Datarunner tab. No rank required — every pilot can contribute. Discord login required to submit.
Pirate Deck · Shard Intelligence
Is that pirate on your server?
Star Citizen runs multiple server instances — called shards — at any time. A pirate reported on one shard won't necessarily be on yours. The Pirate Deck can read your Game.log to identify your current shard and assigns it a unique Star Citizen themed codename. One tap on What's My Shard? shows your codename — so you can instantly see if a report came from your instance. No setup beyond syncing your log file once.
Section 09
Next steps
You've got the fundamentals. Now it's about repetition, reinvestment, and reputation. Every run you complete teaches you something — about terminal flow, route timing, what cargo moves fast, and which systems to avoid on a Friday night. Here's what to focus on next.
Rank Up
Log every run
Every run logged in Schaulers builds your Hauler Rank — from Drifter all the way to Quantum Magnate. Unlock the Datarunner tier to start submitting live price data and help the whole community.
Upgrade Your Ship
Reinvest your profits
Don't upgrade too early — master your current ship first. But once you can consistently clear 2–3M aUEC, the Freelancer MAX or Constellation Taurus opens up a new tier of profitability.
Join the Community
Fly with others
Convoy hauling with other pilots means shared intel, escort options, and better route coverage. Jump in the Schaulers Discord — there are haulers running routes right now who'd love the company.